Showing posts with label Hunkydory For the Love of Stamps. Show all posts

22 April 2021

Another selection of Sketchbook cards


Hello everyone.

Here are more samples made with new stamps from Hunkydory FTLS Sketchbook.

For the cards

Hunkydory For The Love of Stamps Sketchbook stamps watercoloured with Prism brush markers,
On some images I used embossing powder.
Prism inks,
Rainbow miri card,
Adorable scorable card.


For this card I made inky background, by adding inks to the glass matt and spraying some water, then applying watercolour card to inks.


Thank you so much for looking and leaving your comments.
Have a lovely day and happy crafting.
Hugs Natalia.


21 April 2021

Sketchbook cards


Hello everyone.

Sharing card samples made with new stamps from Hunkydory FTLS Sketchbook stamps.

Here is a stepper card.


For the cards
For The Love of Stamps Sketchbook stamps coloured with Prism craft markers and Triblend markers.
Adorable scorable card,
Circle die,

Bridge shaped card


And a Slimline card.


Hunkydory Bohemian bliss papers and gem stones.
I really enjoyed playing with those stamps.

Thank you so much for looking and leaving your comments.
Have a wonderful day and happy crafting.
Hugs Natalia.


22 March 2021

Selection of cards For The Love of Stamps


Hello everyone.

Sharing another selection of card samples for Hunkydory For The Love of Stamps new release Pocket Sized Puns stamps. 


This is a penny slider card with adorable turtle.

For the cards I used 
Hunkydory new Pocket sized puns stamps,
Prism craft markers and Triblend markers,
Prism glimmer mist,
Prism pearlescent powders used for a card with lots of doughnuts.
On some cards I used circle dies and Moonstone hexagon dies.

I hope you are all doing well.
Thank you so much for your comments.
Have a wonderful day and happy crafting.
Hugs Natalia.


19 December 2020

Slimline Reindeer cards

Hello everyone.

Sharing more Christmas cards.


For the cards

Hunkydory For The Love of Stamps Snow much fun Stamp set, watercoloured with distress oxide inks,
Lisa Horton Crafts nested postage slims dies, Mermaid tails glitter,
Glitter card,
Snowflakes stickers from the Works shop,
DL cards,

Two of the cards look different, that's when I smudged some ink at the background. So I fussy cut the images and sentiments, added some blue ink for the background and adhered the reindeer images and sentiments with 3D foam pads. And on one of the card I added some glitter.


Thank you for stopping by and leaving your comments.
Stay safe and happy crafting.
Hugs Natalia


5 May 2020

7 Birthday

Hello everyone.

Sharing a birthday card for a 7 year old girl.


For 6x6 card
Hunkydory FTLS Wish upon a unicorn stamp, watercoloured with Prism brush markers.
Plane cute stencil used for the clouds with Oxide inks twisted citron, tumbled glass, shaded lilac and spun sugar.
Hunkydory Happy town set of dies Build a scene die and weather forecast dies.
Lisa Horton crafts Polka dot numbers stamp and numbers dies, the number and word stamped with picked raspberry oxide ink.
Added Wink of stella to the images, number and clouds.
Papermilldirect card,
Taylored expressions sentiment stamp.


Inside of the card, I added a unicorn with the clouds.


Thank you for looking and leaving your comments.
Stay safe and Happy crafting.
Hugs Natalia.


6 March 2020

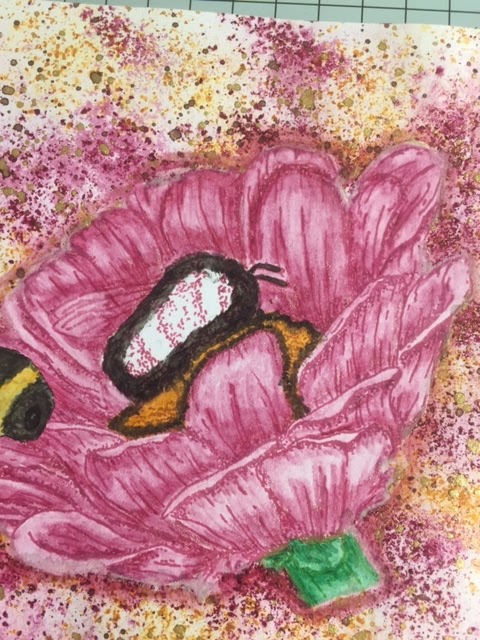
Another bumble bee card


Hello everyone.

Sharing a card with flower and bumble bee coloured using Prism watercolour pencils from Hunkydory.


For 7x7 card

Hunkydory crafts Prism watercolour pencils, water brushes,
 Prism watercolour card,
For the love of stamps Bumble bee,
Prism Blackcurrant jam and Slate grey inks,
Prism pearlescent powders Glistening Gold.
Hunkydory Masking tape.
Black card,
Sentiment,
Vellum and gem stones.

Here some photos how I made the background for this card.


I stamped the flower with blackcurrant jam and masked with masking sheet by stamping into masking sheet and cut around the edge. I mist some water to watercolour card and using craft knife i shaved some colours from the tip of pencil into card using red and yellow pencils. Then sprayed more water on top.


I also added gold pearlescent mica powders to the card while the card is still wet for sparkle.
Then I coloured the card in with pencils and water brush.

For the bumble bee and vellum wings.


Stamp the bumble bee image, colour in and cut the body around without wings.


Stamp the bumble bee into vellum twice with grey ink, cut the wings out by leaving slightly longer at the end. Using a craft knife cut into bee's body where the wings are and add the wings into the cut and secure at the back with strong tape. The photo below.


I coloure with black pencil around the bee's body for shadow on the flower and added the bee with foam pads on top.


Thank you for stopping by and leaaving your comments.
Have a wonderful day.
Hugs Natalia.


13 February 2020

Happy town shaped card


Hello everyone.

Sharing a shaped card using new Hunkydory Happy Town stamps, papers and dies. 
The new collection of Happy Town is brilliant. Here I made a postman theme card.
The new launch is today on Create and Craft at 9am and 6pm.


For the card I used

Hunkydory crafts Happy Town Postman stamp set, papers,
Moonstone dies,
Alcohol markers.
Ink me white card.
The images coloured and fussy cut out.


Thank you for stopping by and leaving your comments.
Have a wonderful day and happy crafting.
Hugs Natalia.

12 January 2020

Flourish card


Hello everyone.

Sharing a flourish card. Made a sample for Hunkydory For the love of stamps last year.


For 7x7 card
I used For the love of stamps Rosy reflections stamp, heat embossed the image with WOW white embossing powder and coloured with Copic markers. Cut the little square at the centre of flower image. For the background, I randomly stamped the flower image with versa mark sticky ink and heat embossed. Blended some memento inks to the background for some colour to match the flowers.
Cut a smaller square and stamped the sentiment and heat embossed with white powder and blended some memento inks. 
Added some pearls. 
Papermilldirect card.


Thank you for looking and leaving your comments.
Have a wonderful day.
Crafty Hugs Natalia.

3 January 2020

Snow much fun one layer cards


Hello everyone.

Wishing you all a very Happy and Healthy New Year!
Sharing some Christmas cards which I made in December. I challenged myself to make one layer card and end up making two cards. On one of the cards I used Crayola pencils to colour the image and for other card I used watercolour pencils.


For the cards

Hunkydory For the love of stamps Snow much fun stamp set
Hunkydory masking sheets,
The image inked with Archival black ink,
Watercolour pencils and Crayola colouring pencils,
Heatembossed the backgrounds using snowflake stamps with Versa Mark clear ink and WOW white embossing powder.
Blended the backgrounds with distress oxide Tumbled glass and Wilted violet inks.
On the purple card I added some glossy accent to the lights, present and ice.


A closer look at the cards.


The images are so easy to colour in and the penguins image are so cute.

Thank you for looking and leaving your comments.
Hugs Natalia.

24 December 2019

Santa Claus cards

Hello everyone.

Sharing more Christmas cards with the same design.


For 6x6 cards

Hunkydory For the Love of Stamps Santa Claus stamp set, Santa image heat embossed with gold and platinum powders. The Santa image coloured with Copic markers, Santa's hat coloured with red glitter pen.
Sue Wilson stitched squares frame and flag dies.
Papermilldirect card.
Patterned papers Bo bunny and Papermania.
Gem stones.


Thank you for looking and leaving your comments.
Wishing you all a Merry Christmas and a Wonderful New Year!
Crafty hugs Natalia. 

17 December 2019

Polar bear


Hello everyone.

Sharing a card with a polar bear. I did this card as a sample for Hunkydory For the love of stamps.


For the card
Christmas cuties stamp set Hunkydory For the Love of Stamps 
Papermilldirect white smooth card.
Wow embossing powders.
Star gem stones.
The image stamped with black ink and coloured with copic markers. I stamped the bear on masking paper and cut him out. To make the circle scenery I cut a circle on masking sheet and added the masking sheet on top of the bear image background card and also added masking bear on top of the bear image. Made some mountains stencil by tearing the card and applying on top of the circle securing with some tape. Then I blended blue dye inks starting with lighter colour from mountains and going with darker shades of blue inks to the top. After the ink dried I removed the mountain shape card and stamped some snow with sticky ink and heat embossed with white glitter embossing powder. I removed all masking pieces from the background and added some sentiment with silver EP and heat embossed to the bottom of the card. On a slightly bigger card I blended blue inks around the edges with lighter colours from the bottom of the card and gradually adding darker shades of blue inks to the top of the card, stamped the snow with sticky ink and heat embossed with white glitter powders. Glued the bear image to slightly bigger coloured snowy card and added to the base card.


Those stamps are so adorable and easy to colour.

Thank you for looking and leaving your comments.
Have a wonderful day.
Crafty hugs Natalia.