Showing posts with label That craft place. Show all posts

28 February 2020

Sugar and Spice card


Hello everyone.

Sharing a Z fold shape card made with new Lisa Horton Crafts dies and new Sugar and Spice image.


For the card

Sugar and spice coloured with Copic markers,
Lisa Horton Crafts New Nested banners die set,
Four point bloom stamps and dies,
Stencil Pennies in a lane,
Ticker phrases sentiment stamps,
Stitched scalloped circles dies,
Distress Oxide Abandoned coral ink,
Kuretake Gansai Tambi gold paint used for splatter on embossed background card,
Papermilldirect card,
Vellum and WOW white embossing powder


You could visit Crafting with Lisa Horton blog where you could see lots of gorgeous projects and some new products.
Thank you for stopping by and leaving your comments.
Have a wonderful day.
Hugs Natalia.


21 February 2020

Z fold pop up card


Hello everyone.

Sharing a Z fold pop up card with butterflies. I made a background with one of new stencils from Lisa Horton Crafts which are coming soon.


For the card

Lisa Horton Crafts butterfly flourish dies and stamps,
Daisy burst dies,
Be Happy sentiment stamp,
Stencil Pennies in a lane,
Pearls.
Papermilldirect navy and white card.
Distress oxide stormy sky ink,
Gansai tambi silver paint added for splatter.
Acetate or packaging.


A 4 navy card fold in a half and cut the edge off around 6 cm that you have 6x6 card and a strip of card for the front. Score and fold in a half the front navy card and navy strip. Cut some panels from white card for the navy card and strip card slightly smaller then the navy cards. 
Apply stormy sky ink to the white panel cards with stencil lightly, stamp a little butterfly randomly.
Add little of stormy sky ink to the acrylic block with little bit of water and using little brush add splatter to the stenciled panels, I use one of my parcel box to add splatter to protect from going everywhere. Did add some silver splatter for sparkle using paints with water.


Mat and layer stenciled panels to the card. Stamp a sentiment onto right side of the panel strip.
Cut daisy burst edge die from navy card and glue to the navy strip card for the front card. Glue the strip with daisy edge to the main card that folded side of strip goes to the inside of card. Cut two strips from navy card measuring 2.5 cm wide by 9.4 cm long, score at the both ends 1 cm and fold. Add strong glue tape to the ends of strips and secure them to inside of the card.
Cut acetate strips the width of 0.8 cm. Add the butterfly to the top of acetate strip with strong glue tape. Randomly add the butterflies with acetate strips to the navy strip of inside of card with strong tape. Add some smaller butterflies to the front and inside of card.
Cut lots of detailed butterflies in white card and solid butterflies in navy card, mat and layer the butterflies and add pearls to the center of butterflies. Cut some flowers in white card and blend some matching colour ink to the petals and glue to the flowers on the daisy edge, add pearls to the center of flowers.


Thank you for stopping by and leaving your comments.
Have a wonderful and crafty day!
Hugs Natalia


15 February 2020

Butterflies birthday card


Hello everyone.

Sharing a simple card watercoloured with distress inks.


For the card

Lisa Horton Crafts Butterfly flourish stamps,
Stitched scallop rectangle dies,
Ticker phrases sentiment stamps,
Pearls,
Watercoloured card,
Distress inks,
Papermilldirect card,
Wow embossing powder.


Thank you for stopping by and leaving your comments.
Have a wonderful day.
Hugs Natalia.


28 January 2020

Butterfly flourish and Mermaid tails glitter.


Hello everyone.

Sharing a card made with butterfly flourish and mermaid tails glitter.


For 7x7 card

Lisa Horton Butterfly flourish dies and stamps, 
Lisa Horton Be happy sentiment stamps,
Mermaid tails lilac sea glitter and pearls,
Stitched square dies,
Purple ink,
Versafine black ink,
Papermilldirect card.


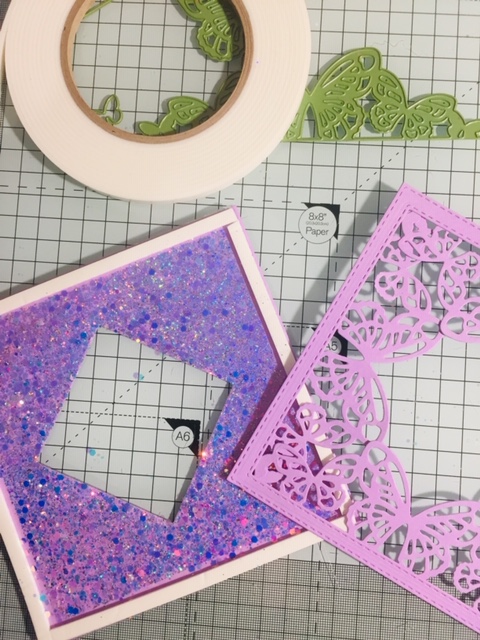
Cut four butterfly flourish edge dies and cut a frame with square dies that will fit the butterfly edge inside.


I cut the square from purple card and added to double sided sticky sheet, then I cut a smaller square at the center of this square, as you can see above (If you lay the butterfly edges around square frame you will make almost a diamond shape square at the center). I covered the edges of card little bit with the release paper from sticky sheet, that glitter won't go there (see below the photo) Apply the mermaid tails lilac sea glitter to the card.


Use the backing sheet to glue the glitter to the card.


Glue four butterfly edges to the frame which made from square dies.
 I added foam tape to the glitter card at the edge and added the butterfly frame on top.

 From little square with sticky sheet I cut large butterfly and added glitter.


Choose a sentiment which will fit in center of butterfly frame, stamp to the center of base card, I also stamped a tiny butterfly next to sentiment in purple colour ink. 
Glue the finished frame to the base card and add the butterfly to the card. Add some pearls.


Thank you for stopping by and leaving your comments.
Have a wonderful day!
Hugs Natalia.


18 January 2020

Z fold flourish card...


Hello everyone.

Sharing my first post for Lisa Horton Crafts.
On Monday Lisa will be showing her new products on Create and Craft at 1pm and 6pm.
Here is a tutorial of a simple Z fold card with beautiful daisy flowers and a fab stencil.


For Z fold card

Edgecutz Daisy Burst craft dies,
Be Happy Sentiments DL stamp set,
Nested Banner die set,
Tartan stencil,
Pearls,
Lavender colour ink.
Black ink,
White card,
Perfect pearls.


Use A4 white card. mark at 15 cm on one side and on the other side of the card and cut diagonally.
As you can see on the photos.


Fold the card twice to make a Z fold card as shown below. You can see some measurements on the photos.


Cut slightly smaller panels for the card as shown below in the photo for matting and layering.


I blended lavender ink to the panels using Tartan stencil.


Add more ink around the edges


I added some sparkle to the card by mixing Perfect Pearls with water and added a splatter to the card panels and flowers.
You can use any sparkly paints or powders.


Cut daisy flowers and add some ink to the edges. Add some shape to the flowers by using some embossing tools or sometimes I use a pen to shape the petals.


I coloured medium size flowers with sparkly powder and added lavender ink to little flowers. 


You will need to make nine flowers for this card. Add beautiful purple pearls to the centre of flowers from the pearl set. Add the finished daisies to the top edge of the card.


Stamp a sentiment and die cut the banner using Nested Banner die set, add lavender ink around the edges of banner. Add the sentiment to the front of the card.


 I enjoyed making this card and using tartar stencil. This is my second project using this stencil and it will be also great for masculine cards and projects.
Dont't forget to watch Lisa on Create and craft on Monday 20th January.

You can find some beautiful projects, sneaky peeks and tutorials on the Blog, Facebook and Instagram.
Facebook group Crafting with Lisa Horton

Thank you for stopping by and leaving your comments.
Crafty hugs Natalia.