Showing posts with label Watercolour with distressed inks. Show all posts

2 March 2021

Peony Blooms cards


Hello everyone.

Sharing some cards made with Peony blooms stamps and dies from Lisa Horton Crafts


I made a video tutorial for this card. You can find the tutorials on my YouTube channel and also over on Crafting with Lisa Horton YouTube channel. Hope you like it.


For this card I used
Lisa Horton Crafts Peony blooms stamps and dies,
Bubble wrap stencil,
Black and clear embossing powders,
Pearls,
Brush markers and inks.
Papermilldirect card.

And here is another card made with Peony blooms. For this card I watercoloured the peonies with distress inks and added some splatters. Heat embossed the sentiment with gold embossing powder. Blended some inks to the flowers at the corners, used masking sheets for the flowers before adding the inks to the corners.


Thank you so much for looking and leaving your comments.
Hope you are all doing well. Have a wonderful day.
Crafty hugs Natalia.


23 April 2020

MDF Tag Canvas


Hello everyone.


Sharing a canvas made with MDF tags and a background using beautiful stamps and stencils.


For the canvas I used

Lisa Horton crafts MDF tags and panel,
Majestic and Jewelled butterflies stamps,
Trailing foliage Ivy stamp set,
Daisy Burst stamp,
Nested banners dies,
Bubble wrap, Script stencils,
Mica powders,
Sisal,
Gold embossing powder,
White card,
Inks and glue gun.


I used the panel at the back of tags with hot glue gun.


 Added white gesso paint to the edges of tags as you can see on the photo.


I blended dye inks with stencils randomly to the white card, used purple and green colour inks.


I drawn around the canvas with pencil on the back of blended card, also I marked little dots where the little holes of the tags are. 


Cut around the card then I draw lines of the edge around 0,4 cm to make slightly smaller then the canvas itself.


I used my punch holes and punched holes from the back of the card where I marked little dots.


As you can see the photo above, the card shape is slightly smaller the the canvas.


I did added some splatter by mixing some ink with water on acetate and adding to the card. Used distress tool for the edges and tore some edges little bit and blended some ink around the edges.


I stamped some daisies and ivy with inks, some daisies I stamped with Versa mark sticky ink and added pink mica powder to the stamped flowers. Then glued the patterned card with tacky glue to mdf tag canvas.


Stamped the butterflies and Ivy coloured them with distress inks using a bit of water. Fussy cut out the butterflies and ivy. I mixed little bit of pink mica with water and coloured the butterflies on top of red colour. Stamped the sentiment with Versa mark sticky ink and heat embossed with gold embossing powder. I layered some ivy and butterflies into canvas before gluing them as you can see the photo above.

Please come and join Crafting with Lisa Horton Facebook group 

Thank you for stopping by and leaving your comments.
Stay safe.
Crafty Hugs Natalia.


15 February 2020

Butterflies birthday card


Hello everyone.

Sharing a simple card watercoloured with distress inks.


For the card

Lisa Horton Crafts Butterfly flourish stamps,
Stitched scallop rectangle dies,
Ticker phrases sentiment stamps,
Pearls,
Watercoloured card,
Distress inks,
Papermilldirect card,
Wow embossing powder.


Thank you for stopping by and leaving your comments.
Have a wonderful day.
Hugs Natalia.


29 May 2019

Teenagers cards


Hello everyone.

Sharing two teenagers cards which I made for my son's friends. I have to make more teenagers cards and these crazy dogs are great for teenagers. So I have more stamped dogs images coloured and ready for new cards. Just need to make more messy backgrounds.


For 6x4 card

Tim Holtz crazy dog stamps, the image was watercoloured with distressed inks onto white plain card from Papermilldirect.
I used distressed oxide inks for the background, I applied inks to the acetate and sprayed some water then added white card to the inks to make blue watercoloured background. I did add inks couple of times to the card for more colour and dried the card with heat embossed tool.
Sue Wilson stitched rectangles frames and flags.
Justrite sentiment stamps,
Silver numbers stickers and star gem stones from Hobbycraft.


And here is another card for a teenager who loves rugby. This is a very quick card using one of the images from Hunkydory books.


For 5x7 card

Hunkydory book,
Tim Holtz number dies,
Blue card from Papermilldirect.


I enjoyed making messy background on crazy dog card.
My son's friends enjoyed these cards.

Thank you for looking and leaving your comments.
Have a lovely day.
Hugs Natalia.


28 April 2019

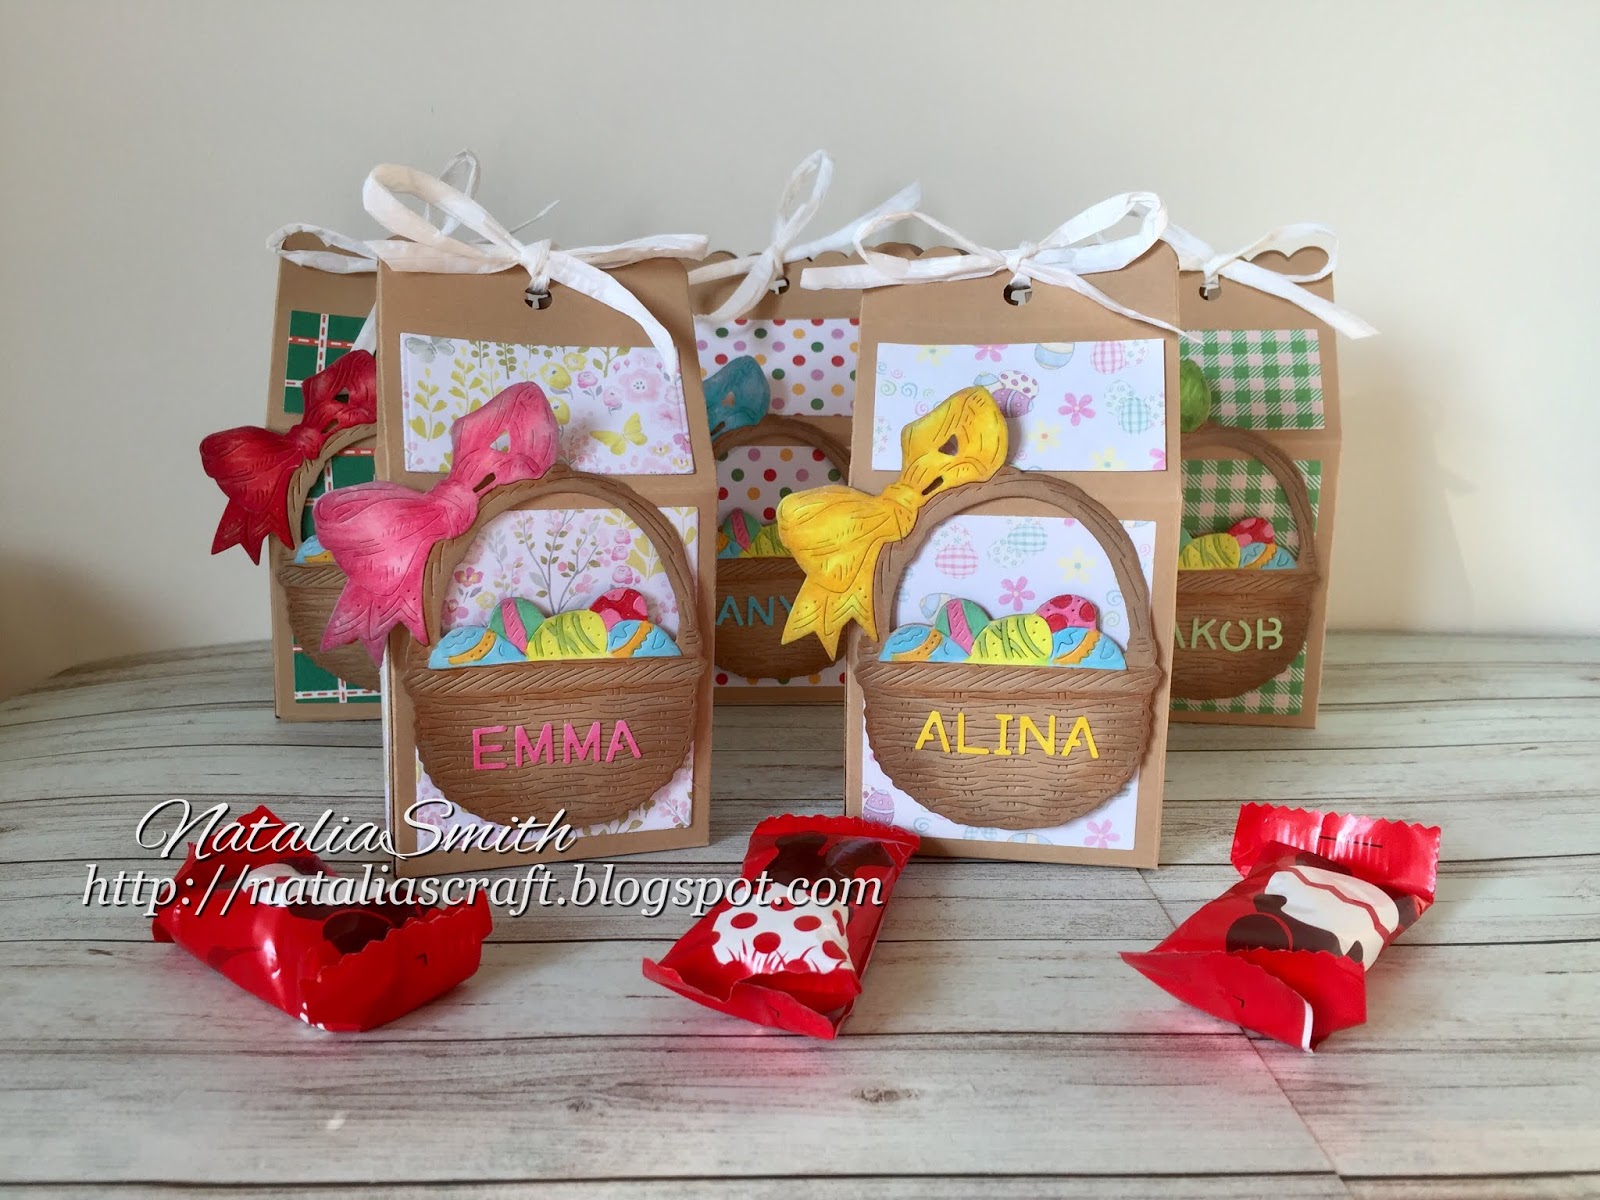
Easter cards and boxes with chocolates

Hello everyone.

Sharing some Easter cards with tulips and Easter boxes with chocolates I made for my boys and my nieces for Easter.


For 6x6 cards 
I used tulips stamp from Creative stamping magazine, the images embossed with white and clear embossing powders and coloured with distressed inks.
Tattered lace circle pin dots die, antique lace circle and strung lace die sets,
Sue Wilson pierced flag die,
Justrite sentiment,
Natural white card from Papermilldirect,
Nuvo drops.


Easter boxes.


Crealies box dies,
Patterned papers from my stash,
Baskets Tattered lace wicker wonder dies colored with Copic markers,
I used Memory keepers alphabet punches,
Craft card from Papermilldirect,
White paper ribbon.


My boys and nieces loved their personalised Easter boxes.

Thank you for stopping by and leaving your comments.
Happy crafting.
Hugs Natalia.


15 April 2019

Bunny with balloons


Hello everyone.

Sharing a birthday card with bunny and balloons,


For the card

Bebunni stamp Crafters companion I watercoloured the image with distressed inks.
Crealies stitched rectangle frame dies.
Lawn fawn sentiment embossed with white embossing powder,
I added some coloured gem stones to both of the corners from Little things from Lucy's cards,
Card from Papermilldirect,
Nuvo glitter pen added to balloons for little sparkle.


Thank you for looking and leaving your comments.
Have a wonderful day.
Hugs Natalia.


18 February 2019

Cup of tea set of cards


Hello everyone.

Sharing some cards with cup of tea image. I made four cards with the same image which stamped with grey ink and embossed with white embossing powder.


For 6x4 cards

The stamp from Simply cards and papercraft magazine, I embossed two of the cups with Wow white  embossing powder and for the other two images I used archival watering can ink and coloured the images with distressed inks using water.
Sue Wilson stitched rectangle frame dies,
Marianne designs doily dies,
Tattered lace circle dies,
Patterned papers from the Range shop and First edition,
Gem stones from Lucy's little cards,
Nuvo drops and sequences.


Thank you for stopping by and leaving your comments.
Happy crafting.
Hugs Natalia.


6 February 2019

Two male birthday cards


Hello everyone.

Sharing two male cards with glass of wine. 


For 6x6 card

The stamps and dies Apple Blossom came free with papercraft essentials magazine,
I coloured the images with distressed inks and added some splatter.
Tonic square and shape frame dies,
Card from Papermilldirect,
First edition pattern papers,
Distressed inks.


And inside of the card, the sentiment from Justrite stamps and a bit of splatter.


Thank you for stopping by and leaving your comments.
Happy crafting.
Hugs Natalia.

26 January 2019

Make a wish shaker card


Hello everyone.

Sharing a shaker card with these adorable images from Craftin desert divas.


For 6x6 card

The images from Craftin desert divas Troll wizards stamps were stamped with Versafine black ink and embossed with clear embossing powder. I watercoloured the images with distressed inks. Papermilldirect card,
The background was made with brusho powders and I added a splash of champagne gold Gansai tambi paint for little sparkle.
Sue Wilson pierced oval die,
Tonic sentiment die cut twice in black and white.
Star sequences from Hobby craft.


Thank you for stopping by and leaving your comments.
Have a lovely day.
Hugs Natalia.


4 September 2018

Celebrate


Hello everyone.

Just sharing a card tutorial with some water colouring techniques using distressed inks. This project I made for Creative Minds Kind Hearts group which you could find on Facebook.

For the image I used All dressed up stamp.


I used stamping platform, firstly I stamped the image with watering can archival ink then I stamped again with wersamark ink and embossed the image with clear embossing powder. This way the ink won't go over the embossed lanes.


Choose coloured inks for the image to colour. Here you can see inks of my choice. I choose broken china colour for the dress because I had already a matching coloured card.


Add inks onto acrylic block 


For the skin colour I used Tattered rose ink and applied the ink with the brush using small amount of water (you don't need lots of water) I added the ink around the top of face for shading then added a bit of water to the rest of the face for lighter colour. If you have too much water on the image you can always take it out with kitchen towel while is wet and apply some more colour if you desire.


For the dress I used broken china ink, I kept shading on the left side and pleats by applying the ink.Then drag the colour with water to the rest of the dress. You can mix the ink with water on the block for lighter colour.


For the hair I used antique linen ink and gathered twigs ink. Apply darker colour to hair for shading.


 Also I added some hickory smoke ink with water to the bottom of the image.
And here is coloured image.


To make this card.

All dressed up stamp,
Aqua A4 card from Papermilldirect fold in half, cut the header die from Tonic on the top of the folded card.


I added some glitter kiss by creative creations to the bows on top of the card 


 Here is some measurements for the card in inches on the photo. And in centimetres is 13cm by 17cm.
Cut the sentiment "celebrate die"from Trimcraft die set four times, I cut three times in white card and one in aqua card. The easiest way to glue them together is to keep the sentiment in the card which is shown in the photo below.


I added the glitter kiss to the sentiment for sparkle.


 For mating and layering I used silver glitter card from Hunkydory cutting with stitched Crealies dies.
Matt the white card with image onto silver glitter card and to the front of aqua card. Also matt and layer card to the inside of the card.


Add the sentiment to the left top side of the card and some gem stones to the card.


Thank you for stopping by and leaving your comments.

Hope you will try using your inks to watercolour your images. 

Happy crafting!

Hugs Natalia.